• Skip to primary navigation
  • Skip to main content
  • Skip to primary sidebar

Clever Homeschool

Fun courses based on your child's interests!

  • Home
  • Free Photo Lessons for Kids
  • “Get That Shot!” photo tags

Teach your child about window light portraits

November 30, 2015 by Jason Huskey Leave a Comment

This lesson is all about picking the right light when taking pictures of people.  When I first started taking pictures of people I had a hard time.  All my pictures turned out terrible and I could not figure out why.  The reason I took bad pictures was the light I was choosing.

I once positioned a group of people outside in the middle of the day with the sun shining right in their faces.  This is the worst possible light for several reasons:

  • People squint when the light is too bright.
  • People’s eyes start watering if they are exposed to that type of light for too long.
  • Dark shadows are formed under their eyes and nose.
  • Skin tones are too bright and washed out

Instead I discovered something called the “Window Light Portrait”.  Window light is typically more soft and pleasing almost any time of day.  By switching to window light you will instantly see an improvement in your pictures.

happy baby boy looks through the window

Step 1 – Pick the right window

Typically a north or south facing window will be best because the sun will never be shining directly into it.  You can usually shoot at any time of day when facing north or south.

East and west is a different story because during a sunrise or sunset the light will be coming directly through the window.  Direct sunlight through a window will create the same problems I described above.

If you can’t find a compass don’t worry too much, just look for a window with nice soft light coming in.  If the sunlight is too harsh use a partially see through white drape over the window.  Don’t use a colored drape as that will change the color of the light.

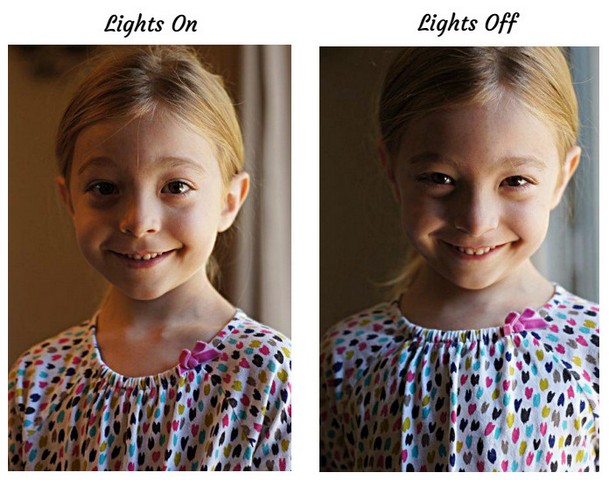
Step 2 – Turn off all interior lights

This may sound strange because we are making it darker.  But the reason you should turn off interior lights is because they have a different color than sunlight.

Normal incandescent lights give off orange colored light.  If they are left on, your subject’s skin color will look wrong.

Compare the two pictures below.  Do you see how her skin looks orange when the lights are left on?

lightsonoff

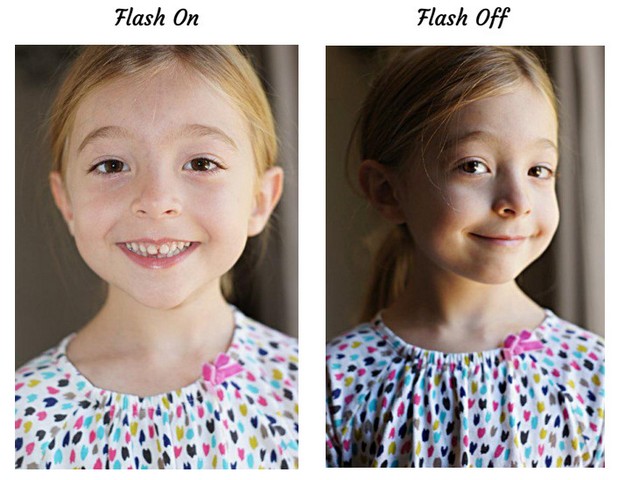
Step 3 – Turn off your flash

In this lesson we are specifically trying to capture the light coming in a window.  Therefore turn off your flash.  Your flash will overpower the window light and we won’t get the effect we’re going for.

If you cannot turn off the flash in “Auto “ mode switch to “Program (P)” mode.

Compare the two pictures below.  You might be thinking the one with flash looks better because it shows more of her face.  Unfortunately it flattens out her facial features and is just kind of boring.  I enjoy the picture without flash because it seems more interesting and mysterious.

flashonoff

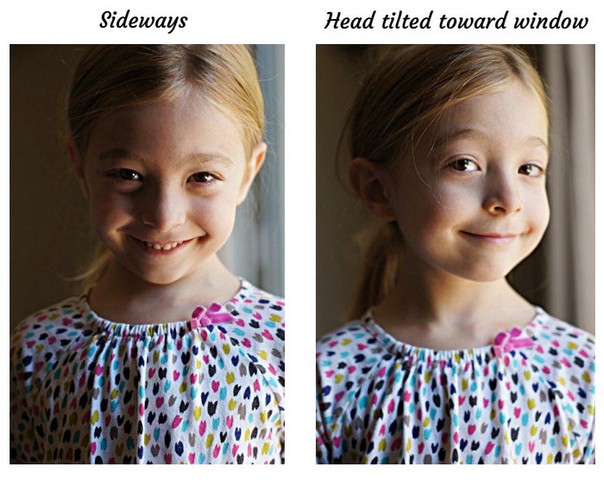
Step 4 – Position your subject

This is the most important step.  Start by asking your subject to stand sideways to the window.  This will throw light on half of their face.

Now have them turn their head slightly toward the window.  This will light their face more evenly.  Use your camera in auto mode and experiment with this setup.

Either of these positions is okay.  It all depends on the look and effect you are going for.

positionsubject

Step 5 – Use a reflector (Optional)

As you can see in most of the pictures above the girl’s face is partially in shadow.  Place a reflector on the dark side to add some light. 

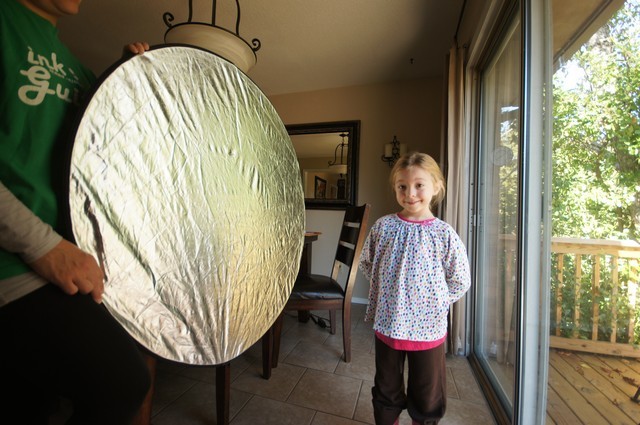
You can purchase reflectors like the one in the picture above on amazon.com for $10 to $15.  Or you can use a white foam core board from Walmart.

reflector

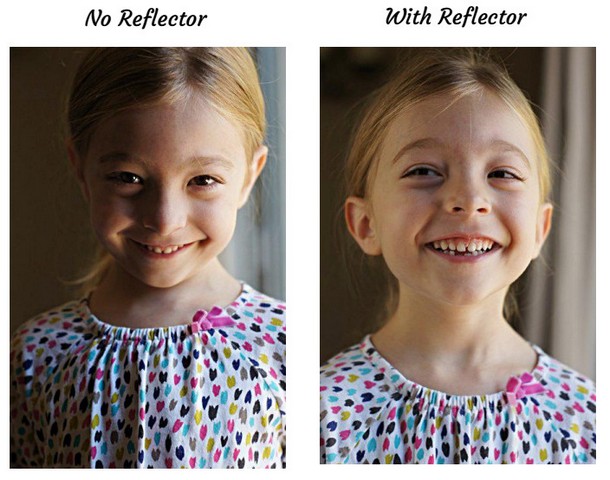
Remember:  Place your subject between the window and the reflector.

Photo Assignment

Take a portrait using window light

Click the link above for a printable photo assignment worksheet.

Share Your Thoughts:  What photo techniques do your kids want to learn next?

Filed Under: Photography

Reader Interactions

Leave a Reply Cancel reply

Your email address will not be published. Required fields are marked *

Primary Sidebar

Free Photo Lessons for Kids

Photo Lessons for kids

Categories

  • Photography
  • Preschool
  • Reading
  • Uncategorized
A multi-generational family gathered around a table at home, engaging in a spiritual learning activity together.

Incorporating Faith into Your Homeschool: Practical Strategies and Resources

Establishing a Faith-Focused Homeschool Routine Families who homeschool often want their days to … [Read More...] about Incorporating Faith into Your Homeschool: Practical Strategies and Resources

A parent and child working together at a desk with educational materials and a laptop, preparing a homeschool portfolio in a bright room.

Creating a Homeschool Portfolio for State Requirements: Step-by-Step Guide

Understanding State Requirements for Homeschool Portfolios Each state sets its own rules for … [Read More...] about Creating a Homeschool Portfolio for State Requirements: Step-by-Step Guide

A parent and child working together at a home study table surrounded by books and educational materials.

How to Handle Criticism and Questions About Homeschooling: Practical Strategies for Parents

Responding to Common Criticisms of Homeschooling Families who choose homeschooling often hear the … [Read More...] about How to Handle Criticism and Questions About Homeschooling: Practical Strategies for Parents

Two or three siblings learning together at a table in a bright room, with one older child helping the younger ones.

The Role of Siblings in a Homeschool Environment: Key Benefits and Challenges

How Siblings Shape the Homeschooling Experience Siblings affect how homeschooling unfolds each day … [Read More...] about The Role of Siblings in a Homeschool Environment: Key Benefits and Challenges

Families with children gathered outdoors near parked RVs, engaging in homeschooling activities and socializing together.

Homeschooling on the Road: Tips for RV and Travel Families

Getting Started With Homeschooling on the Road Families who choose roadschooling often balance … [Read More...] about Homeschooling on the Road: Tips for RV and Travel Families

A family with two children studying together at a table in a bright, organized home classroom.

How to Transition from Public School to Homeschool Smoothly: A Step-by-Step Guide

Preparing for the Transition Families moving from public school to homeschool face a few key steps … [Read More...] about How to Transition from Public School to Homeschool Smoothly: A Step-by-Step Guide

A parent and child sitting at a table in a bright home, working together on a morning routine with books and a tablet nearby.

Homeschool Morning Routines That Set the Tone for the Day: Practical Steps for a Smooth Start

Why Homeschool Morning Routines Matter A steady morning routine helps children ease into learning, … [Read More...] about Homeschool Morning Routines That Set the Tone for the Day: Practical Steps for a Smooth Start

What is Charlotte Mason Homeschooling? Key Principles & Practices

Core Principles of Charlotte Mason Homeschooling Charlotte Mason homeschooling rests on a clear … [Read More...] about What is Charlotte Mason Homeschooling? Key Principles & Practices

A child working with educational toys in a bright, organized homeschool classroom with wooden shelves and child-sized furniture.

What Is Montessori Homeschooling? A Friendly Guide for Parents

Core Concepts of Montessori Homeschooling Montessori homeschooling builds on a child’s natural … [Read More...] about What Is Montessori Homeschooling? A Friendly Guide for Parents

What Is Classical Homeschooling? A Complete Guide for Parents

Core Principles of Classical Homeschooling Classical homeschooling builds on a structured … [Read More...] about What Is Classical Homeschooling? A Complete Guide for Parents